We've all seen the condition of a used corny keg, banged up,
gooey with syrup, scratched and covered in labels.
In just a few hours, your keg can glisten and shine like never before.
gooey with syrup, scratched and covered in labels.
In just a few hours, your keg can glisten and shine like never before.
1. Start by removing the labels. You can use a number of green cleaners or cut to the chase and try acetone and a good sharp blade to peel it off easily. The best method I’ve found is to fill it with very hot tap water and let it sit for 15-30 minutes. The labels will become very pliable and peel right off.
2. Scrub the entire keg with a cleaning agent.
3. Sand the stainless steal with a fine grit paper such as 320 or 400. You can wet sand, but dry sanding seemed to be a bit quicker.
4. Use a tack cloth to remove all dust from surface.
5. (optional) Mask off everything but the bottom of the keg and apply two coats of flat bumper paint. This will stop the rubbing from leaving stains after it gets wet.
6. Mask off top and bottom and apply two coats of self-etching auto primer (gray or white). A second coat may offer better protection and as it dries quickly, re-coating adds little time to the project.
7. (optional) Mask off a square area for the chalk board paint.
8. Auto paints drys quickly, so I applied three successive coats of paint for a smooth and consistent finish.
9. With the chalk board area still masked off, apply several coats of clear lacquer to protect the paint. Allow this to thoroughly dry before the next step.
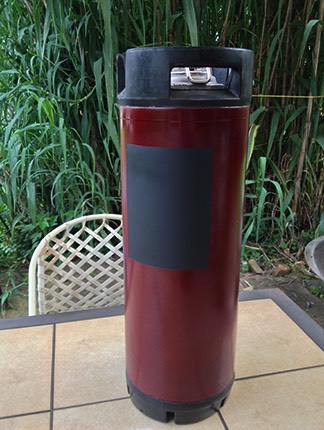
10. Removed the chalk board mask and mask off a considerable area around it to apply chalk board paint. The lacquer creates an edge that simplifies where to mask and keep it it square. Apply two coats and allow to dry. Follow instruction on can before using chalk - essentially, cover the entire board area with chalk and wipe of, you're then ready to use your pimped out keg!
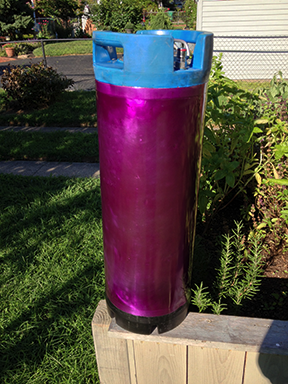
Note: the shiny kegs pictured below have no primer and just two coats of chrome paint.
2. Scrub the entire keg with a cleaning agent.
3. Sand the stainless steal with a fine grit paper such as 320 or 400. You can wet sand, but dry sanding seemed to be a bit quicker.
4. Use a tack cloth to remove all dust from surface.
5. (optional) Mask off everything but the bottom of the keg and apply two coats of flat bumper paint. This will stop the rubbing from leaving stains after it gets wet.
6. Mask off top and bottom and apply two coats of self-etching auto primer (gray or white). A second coat may offer better protection and as it dries quickly, re-coating adds little time to the project.
7. (optional) Mask off a square area for the chalk board paint.
8. Auto paints drys quickly, so I applied three successive coats of paint for a smooth and consistent finish.
9. With the chalk board area still masked off, apply several coats of clear lacquer to protect the paint. Allow this to thoroughly dry before the next step.
10. Removed the chalk board mask and mask off a considerable area around it to apply chalk board paint. The lacquer creates an edge that simplifies where to mask and keep it it square. Apply two coats and allow to dry. Follow instruction on can before using chalk - essentially, cover the entire board area with chalk and wipe of, you're then ready to use your pimped out keg!
Note: the shiny kegs pictured below have no primer and just two coats of chrome paint.
-
 1) Sanded with 400 grit paper and being masked to paint bottom
 -
 2) Bottom painted with flat auto number paint to prevent rubber staining
 -
 3) Keg primed with self-etching auto paint and ready for top coat
 -
 4) Masked to protect area for chalk board paint and being painted red
 -
 5) Final coat of auto paint (2 layers)
 -
 6) Chalk board paint applied
 -
 Final step) The finished keg ready for tapping!
 -
 Ooooooh, shiny! Chrome paint without primer
 -
 Chrome paint without primer